Zone picking step by step: split by zone, pick by cart, merge by order
A step-by-step tutorial: prepare zones, a consolidation area, carts and pickers, then run the full flow — precheck, generate a batch, bind a cart, pick by zone, register the cart's arrival, place each tote into its slot, merge ready orders and track it all on the board.
Overview#
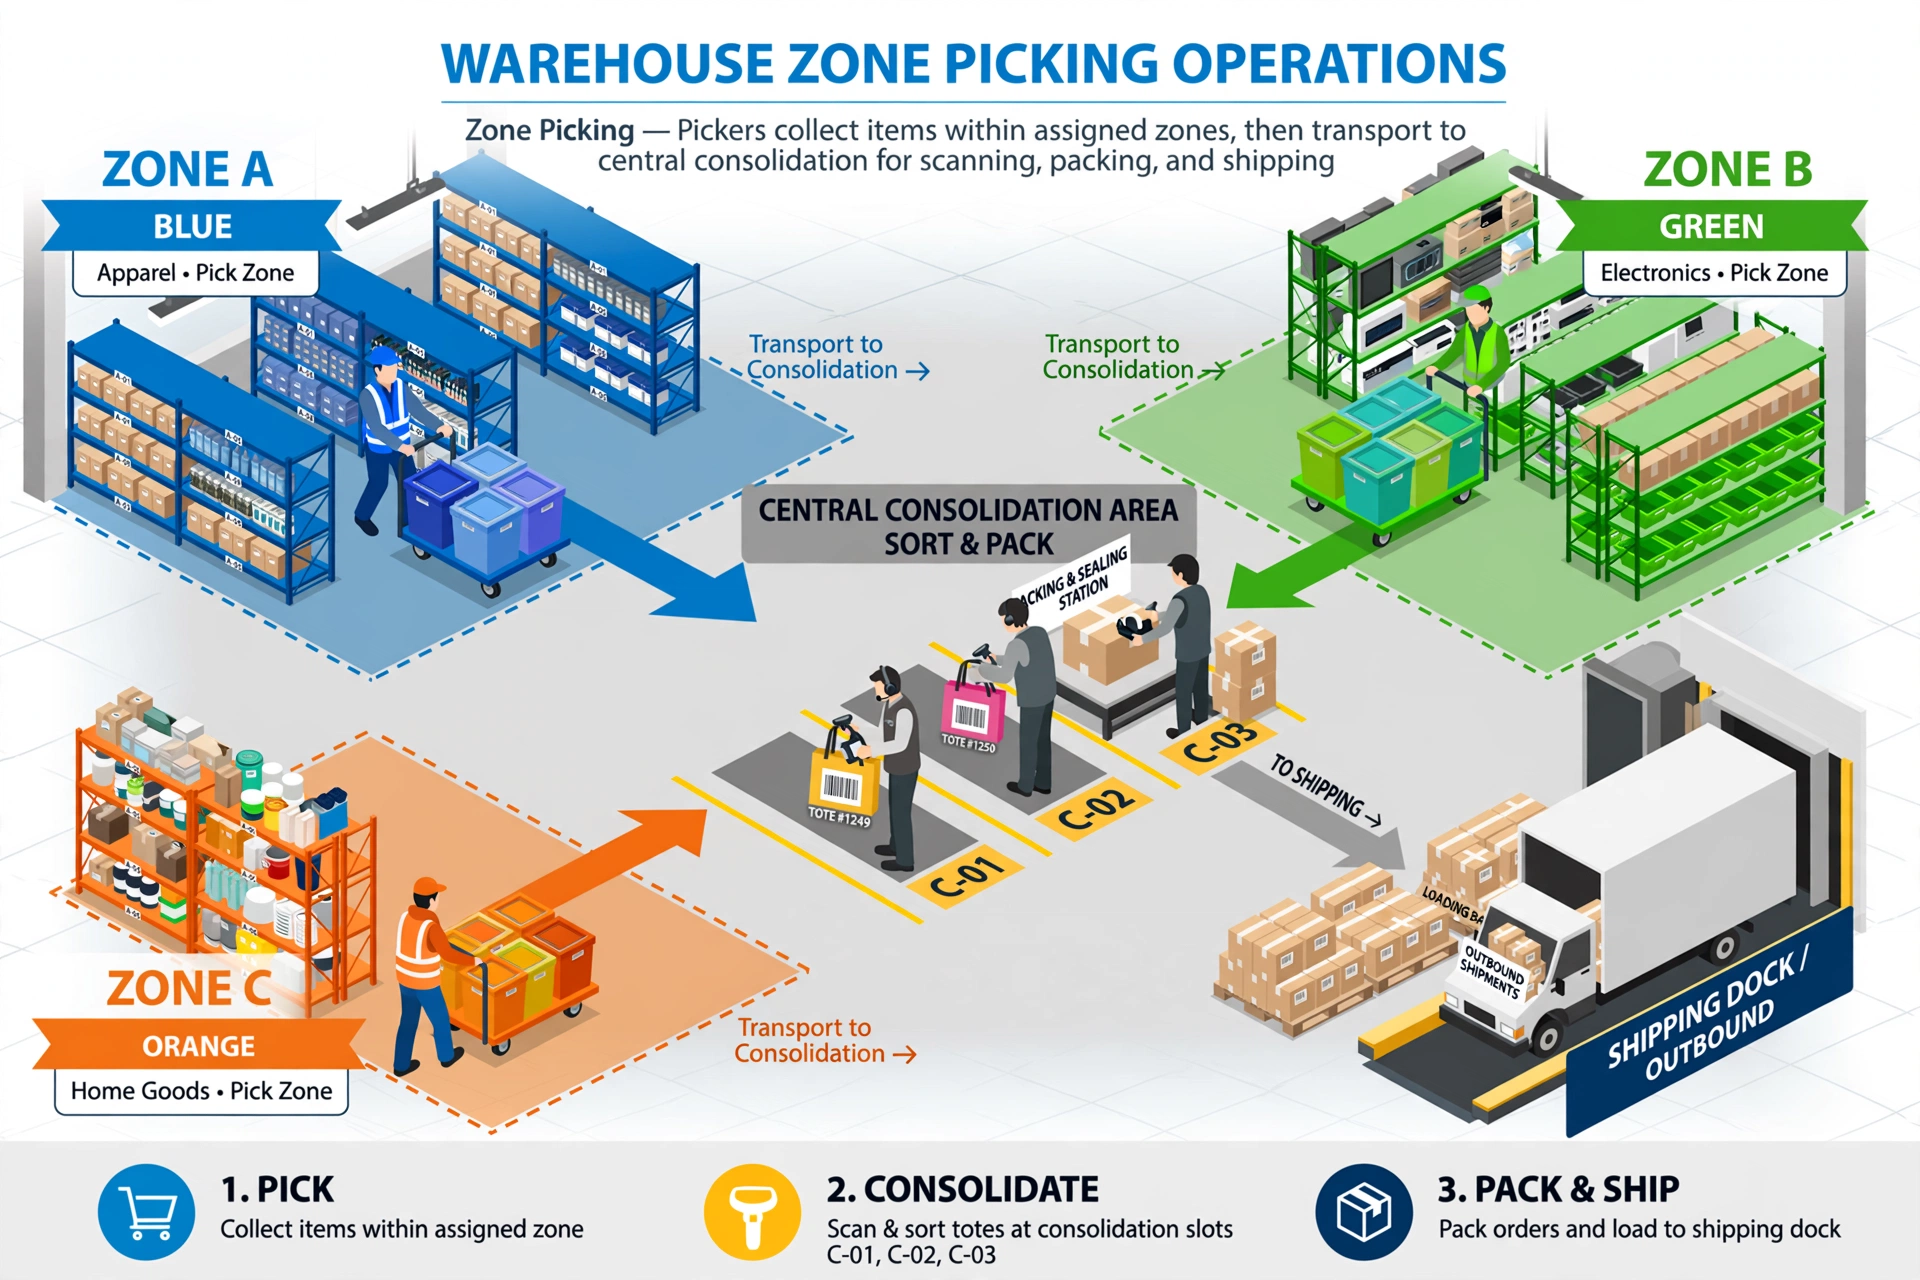
When a warehouse grows, one order's goods end up scattered across several physical areas. Zone picking splits each order by zone: every zone gets its own pick task and its own picker, who picks only inside that zone and loads each order into its own tote on a picking cart. When a zone is done, the whole cart is pushed to the consolidation area and its arrival is registered with one scan of the cart code. Then each tote is placed tote by tote: scan a tote and the system tells you the slot of its order, you put the tote in, scan the slot to confirm, and the tote is released empty for reuse. The system counts, order by order, how many totes should arrive and how many have been placed; as soon as an order is complete it can be merged with a single confirmation — no carton scanning — and then moves on to the packing station, while the consolidation board shows the whole picture live. Remember three phrases: split by zone, merge by order, quantities must match.
Before you start: prerequisites#
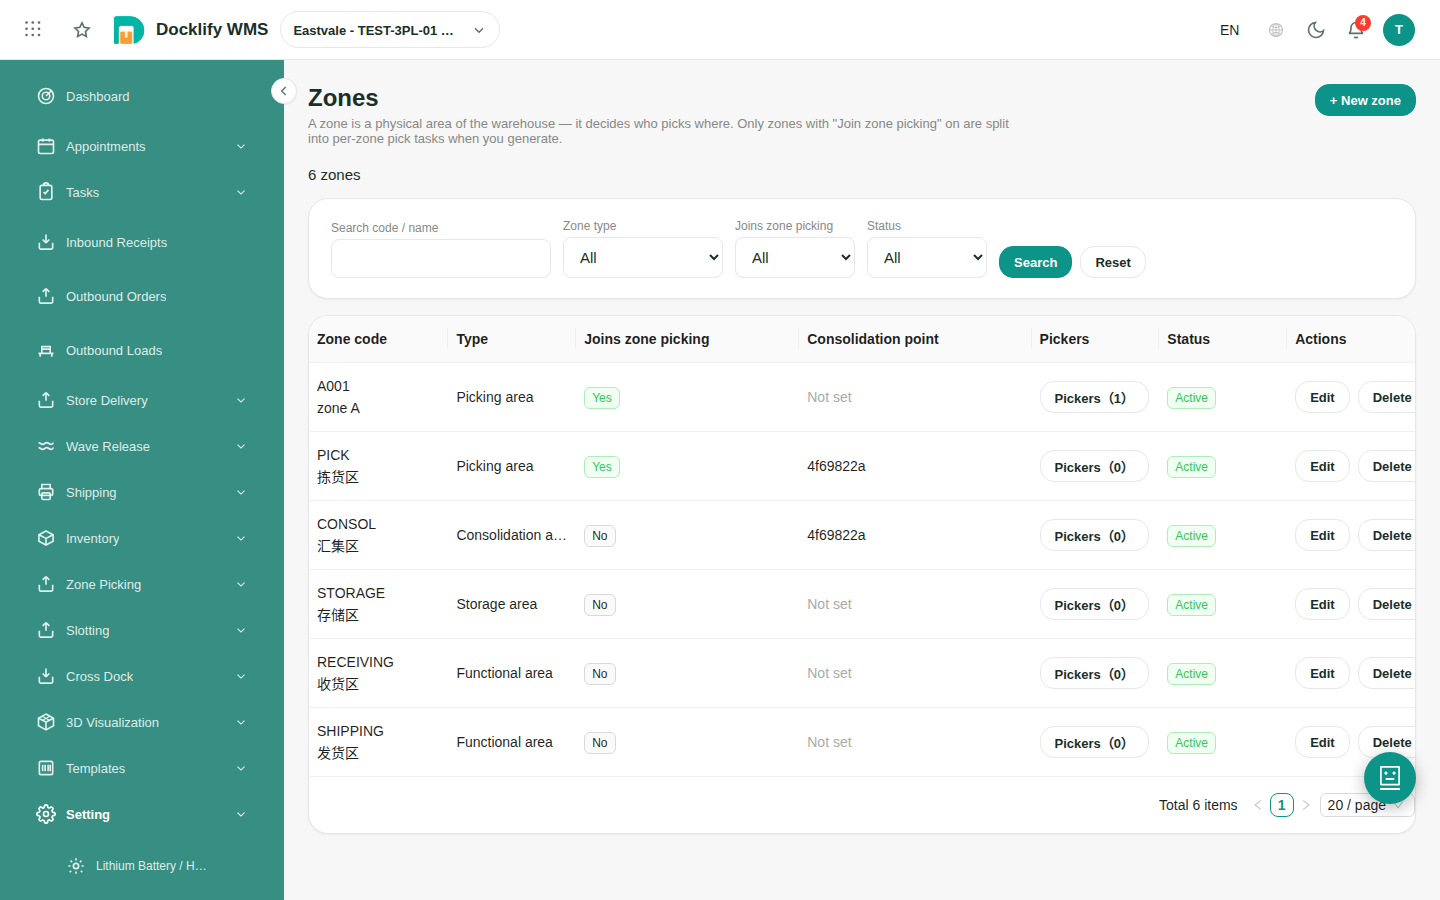
- Zones are set up and zone picking is enabled: every location belongs to exactly one zone, and the picking zones that take part in zone picking have the zone picking switch on. Only picking zones join — storage and functional zones never do.
- Each picking zone has a consolidation point configured: in Zone management, set the consolidation location for every picking zone — that is where its carts are pushed when picking is done. One shared consolidation area for the whole warehouse is the normal setup.
- The consolidation area is ready: a consolidation zone with numbered floor slots — C-01, C-02, C-03 and so on — each with its own barcode label at the head of the slot. Eight to twelve slots handle a typical batch.
- Picking carts and totes are ready: every cart has a scannable cart code, and totes carry permanent, reusable barcodes. The rule is one tote per order — a tote never mixes two orders.
- Each zone has a fixed picker: bind a primary picker (and a backup if you like) to every zone in Zone management. New zone tasks are auto-assigned to the bound picker, so nobody has to hand out work order by order.
- No picker bound? The zone still works: if a zone has no picker bound, generating tasks does not stop — its tasks go to the task pool as unassigned tasks (you will see a note saying the task went to the pool). Whoever has time opens Tasks on mobile, switches to the Task pool tab and claims the task; it then shows up in their My tasks. A supervisor can also assign a pool task to a specific person with Reassign on the task detail page. Binding a picker is a convenience for fixed staffing, not a requirement.
Step by step#
Step 1 — Select outbound orders and open the Zone Pick precheck
On the desktop, open the Outbound Orders list, filter if needed, and tick one or more orders. Then choose "Zone Pick" from the "Create pick task" menu. The system allocates the orders' stock first, then opens the precheck — nothing is generated yet, so you can still back out safely.
Step 2 — Read the precheck: the zone split and shortage warnings
The precheck shows, for every order, how its lines split across zones — which zones hold stock for it and how much. Read it before you confirm anything:
- Zone split: an order with goods in two zones will be picked by both zones and merged later — that is normal, not an error. The precheck also tells you the expected totes per order per zone.
- Shortage warnings: lines that cannot be fully covered are highlighted. Replenish first, or remove the short line from this run and handle it separately — do not generate a batch you already know cannot complete.
- Out-of-zone lines: whole-pallet lines that live outside the picking zones stay on a normal pick task and join the same orders later at consolidation, by order number.
- Zone not set up (red ⚠ tag): if goods sit in a zone that is not registered yet, or whose Zone Picking switch is off, the precheck marks that zone in red. Those goods will not be picked by zone — they go on a regular pick task instead, and the generate step shows the same warning again with the order number and quantity. The goods can still be picked and merged normally; only the by-zone split does not apply to them. To pick them by zone next time, register the zone first under WMS → Master Data → Zones and turn on its Zone Picking switch.
Step 3 — Confirm and generate the batch and its zone tasks
When the precheck looks right, confirm generation. The system creates one consolidation batch with a CB- number (for example CB-20261020-QRM6) covering all the selected orders, and one pick task per zone that actually has stock — a zone with nothing to pick gets no empty task. Each task is auto-assigned to its zone's bound picker, and the system records, per order, how many totes each zone is expected to deliver. That expected count is what consolidation will check against later.
Step 4 — The picker scans a cart code and binds the cart
On mobile, the picker opens their zone task and taps Start task, then scans the picking cart's code. That one scan binds the cart to this task: the cart status flips from Empty to In use, and the system lays out the cart's totes — one tote per order in this task — so the picker always knows which tote belongs to which order before the first pick. A cart only ever serves one batch at a time; a cart already bound to another batch cannot be bound again.
One thing to check before you bind: a tote that still holds goods from an earlier order that has not finished (for example, its cart task ended but the order has not been consolidated yet) is not an empty tote, even if it looks free. The system will not assign such a tote to your new orders. If the cart still has enough truly empty totes, binding succeeds and the occupied ones are simply skipped; if it does not, binding is refused with a message naming the occupied tote and the order it belongs to — finish that order first, or bind a different cart. The same rule guards picking: if you scan a tote that still belongs to another unfinished order, the confirmation is refused and the message names that order. These messages always appear in the language your app is set to.
Step 5 — Pick inside your zone, into each order's tote
Picking itself reuses the screens you already know — only the scope is smaller: you stay inside your own zone and follow the task's route line by line. For each line: scan the location (and the pallet, where the task asks for it), take the quantity shown, drop the items into the tote that belongs to that line's order, and confirm the picked quantity. If a location turns out to be short, report the shortage on the task instead of quietly picking less — consolidation compares picked quantities against the order, and a silent short pick will block the merge later.
Step 6 — Push the cart to consolidation: register the arrival, then place each tote into its slot
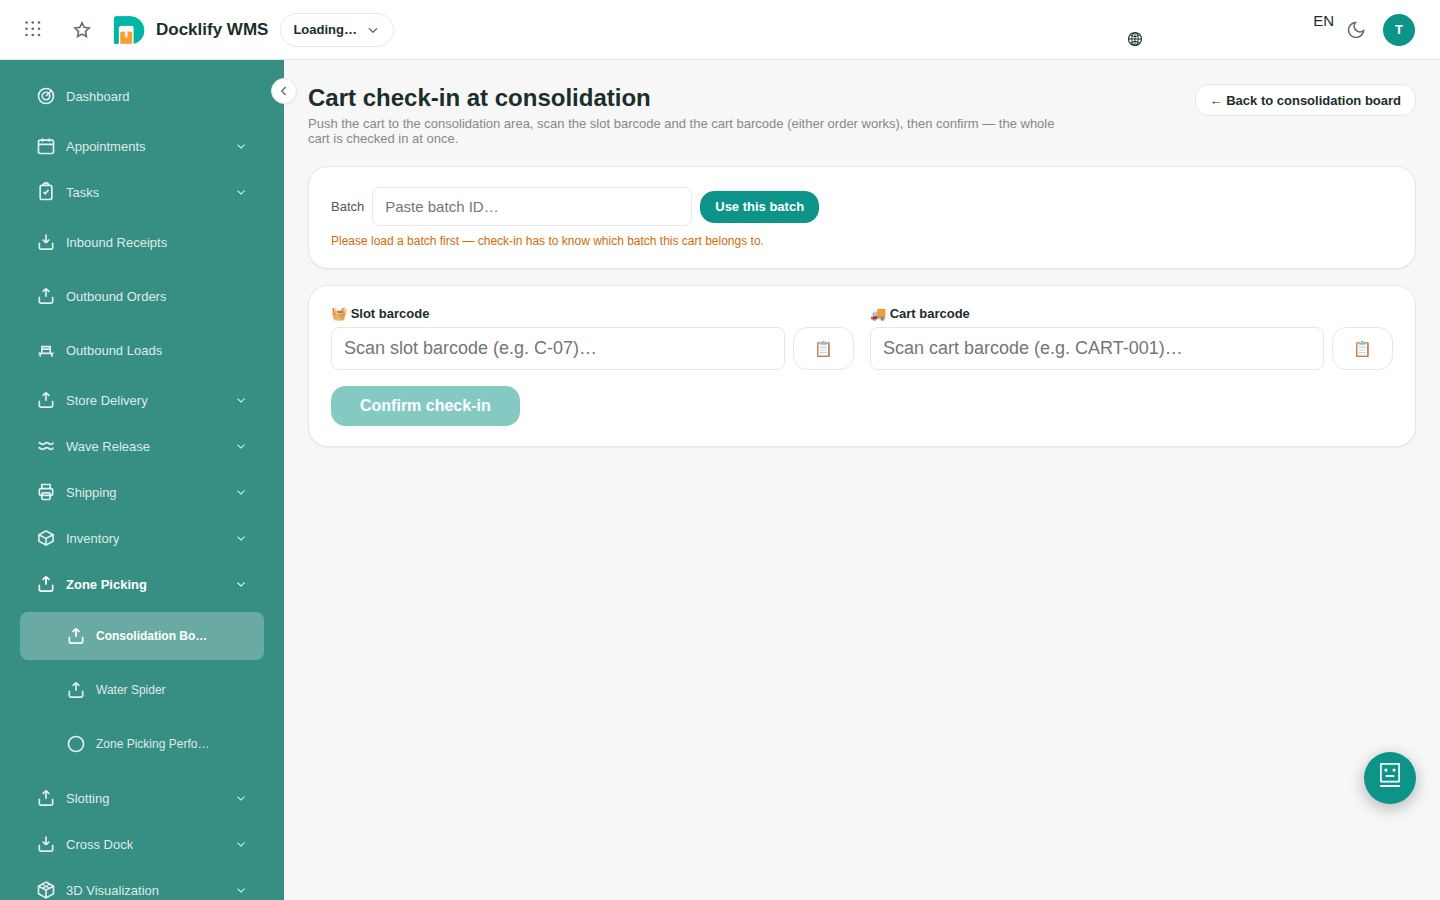
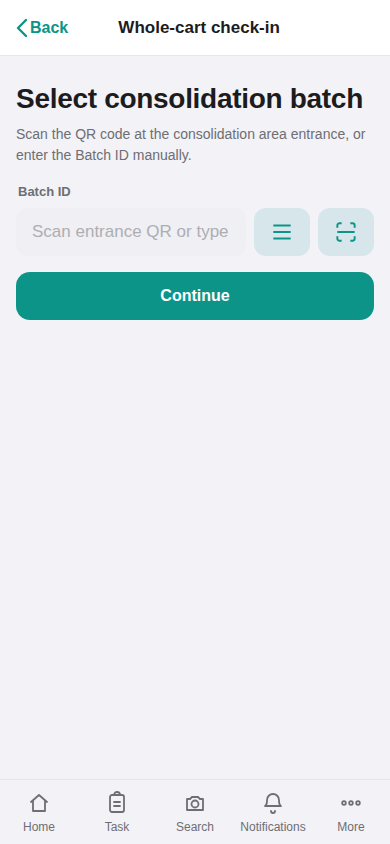
When the zone task is completed, the cart status flips to Full. Push the whole cart to the consolidation area your zone is configured with and register its arrival: on the desktop Consolidation → Check-in page, or on mobile under Consolidation, scan the cart code — that is all it takes; you can also note where the cart is parked (a parking code such as P-07), but a parking note does not reserve a slot for any order. If the cart carries totes from another batch, the registration refuses the whole cart: mixed batches are the number one source of mixed orders, so the cart goes back to be split first. Arrival alone does not count any tote as received — receiving happens tote by tote in the placement step: scan a tote and the screen shows its contents, its order and the slot the system assigns to that order (an order that has no slot yet gets one now), put the tote into that slot, then scan the slot code to confirm. Scanning the wrong slot is stopped on the spot and the screen names the right slot. After each confirmation the screen shows the order's progress — how many totes are in, and which totes are still missing and on which cart — and points you to the next tote to place. The confirmed tote is emptied and released for reuse right away. When the last tote of an order goes in, its slot lights up as ready and a "go to merge" shortcut appears. If a slot physically cannot hold everything, mark it as overflow and the system opens a second, linked slot for the same order. On phones and handhelds, if voice prompts are on, the device reads each step aloud: the slot number digit by digit, what is still missing and where, and a warning when you scan the wrong slot.
Step 7 — Merge an order as soon as all its totes have arrived
You never merge the whole batch at once — you merge order by order, as each one completes. Merging no longer involves cartons: you do not pour totes into outbound cartons and you do not scan any carton code. Confirming the merge is all it takes; packing into cartons and labelling happen later, at the packing station. The scenario below follows the same five parts as the regression scenario library (RG-1454/RG-1455), and the flow diagram after it uses the same step numbers.
- Role: the consolidation operator standing at the slot wall, working on the desktop board, the mobile web page or the app — all three behave the same.
- Before you start: the order shows Ready on the board — received totes equal expected totes across all its zones (for example 2 / 2), its slot is lit as ready, and the estimated carton count is shown for reference only. If an order is still Partial, merge is not offered for it yet.
- Steps: 7.1 Open the order’s merge screen from the board (or the merge page on mobile) — you scan nothing in this step. 7.2 Check what the screen shows: the order number, received / expected totes, its slot and the estimated cartons as a reference. 7.3 Tap “Confirm merge”. That is the whole operation — no carton code, no label checkbox, nothing else to fill in.
- What the system does: before anything is written it runs three checks — the batch is still open, all totes have arrived, and the picked quantities add up to the order. If a check fails, the merge stops and the screen tells you why in plain words: totes still missing (merge is not possible yet), or a quantity mismatch (a red alarm — ask a supervisor to recount; merging stays blocked). If all three pass, the order is marked merged, its slot is released and its totes are freed for reuse.
- Expected result: the order leaves consolidation as Merged and shows up at the packing station as a complete order, ready to pack. Packing into cartons and printing the shipping label happen there — not here. Once every order in the batch is merged, the batch closes and all slots and carts are free for the next run.
Step 7b — Two ways to finish an order: at the packing station, or right at the slot
Step 7 above is the finish for one of the two packing modes a warehouse can choose. The choice is a warehouse setting: WMS → Master Data → Warehouses → open the warehouse → the “Consolidation & packing” group → “Send to the packing station” (for warehouses with a dedicated packing station) or “Pack right at the slot” (for small warehouses without one). Only a warehouse admin can change it, and the board only shows the current mode — it cannot be changed there. Changing the setting only affects orders that become Ready after the change: every order keeps the mode that was stamped on it at the moment it became Ready, so orders already at the wall always finish the way they started.
If your warehouse sends orders to the packing station (the default): when an order becomes Ready, its button says “Pick up”, not “Confirm merge”. Go to the slot, scan the slot code first — that scan is the pick-up confirmation. If the order fills two slots, the screen names the other slot and asks you to scan it too; pick-up only completes once every slot of the order has been scanned. Load the whole order into one spare tote, scan that tote’s code and confirm: the slots are freed, the order shows “Picked up · awaiting packing” and joins the packing station queue (your own pick-ups are shown first on your station). At the packing station, scan the tote to open the order — or pick it from the queue — then check item by item, pack, weigh and label as usual. Once packing is done, the tote is emptied and returns to the pool.
If your warehouse packs right at the slot: Step 7 is your finish. Confirm the merge at the slot, put the goods into the shipping carton, seal it and stick the shipping label on right there at the consolidation area, then send the carton straight to shipping. The order never appears in the packing station queue — that is expected, not a problem. And the two modes cannot be mixed by hand: trying to merge an order that belongs to the packing station stops you with a plain message telling you to pick it up instead, and trying to pick up an order that belongs at the slot tells you to merge and pack it there.
Step 8 — Track everything on the Consolidation Station
Open the Consolidation Station for the batch and you see the whole operation at a glance: every slot and which carts are parked in it, every order with its per-zone progress — which zones have checked in, which are still picking — and a summary counting how many orders are waiting, partial, ready and merged. Supervisors run the floor from this screen: a zone falling behind shows up here first, long before it becomes a late shipment. When every order in the batch is merged, the batch closes and the slots and carts are all free for the next run.
One thing to keep straight: there are two different location ideas. The parking spot is simply where a cart stands, identified by the P- number painted on the floor (such as P-07 — deliberately different from the C- order slots) — noted when its arrival is registered, optional, and reserving nothing; the board lists the carts that have arrived at consolidation together with their parking notes. The order slot is the slot the system assigns to an order when its first tote is scanned for placement, so the order's totes collect in one place while waiting to merge; an order can hold more than one slot if the first one overflows, and its slots are released when the order merges. When you go looking for a cart, use its parking note; when the system talks about an order's slot or about releasing a slot after a merge, it means the order slot.
You do not need a link from the wizard to find the board. Just open the Consolidation board from the menu: the landing page is a warehouse-wide overview of every active batch in the warehouse you have selected at the top — totals for all orders, how many are merged, how many are complete and waiting to merge, and how many are still being picked — plus a card per order (with its batch number, its order slot and its received/expected tote progress) and the consolidation slots currently in use. Click any order card or any row in the batch list below (which also lists closed batches) to open that batch. Batch numbers are the short readable codes like CB-20261020-SEFH: type one into the Batch box at the top to jump straight to it — you never need the long internal ID.
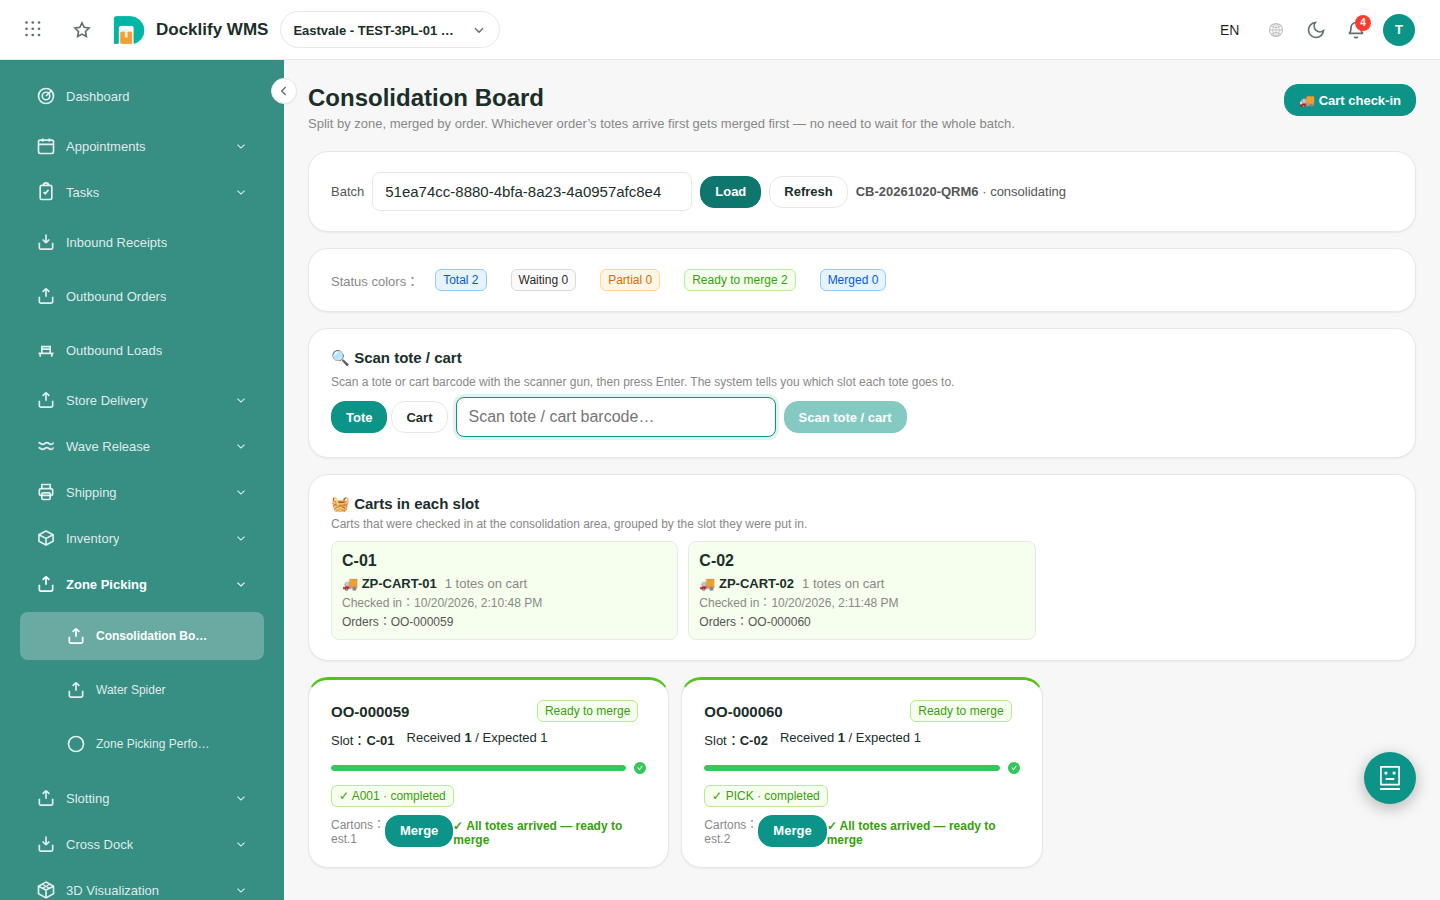
Step 9 — Give the consolidation area a slot pool and watch the whole wall#
By default the board can only list the slots that are currently in use: slots are just barcode labels, so the system cannot know how many your consolidation area really has, or which ones are free. The slot pool fixes that. The pool is the master list of the physical slots that actually exist in this warehouse's consolidation area. Build it once under WMS → Zone Picking → Consolidation Area Setup, on the Slot Wall tab: pick the consolidation area at the top (one picker serves both tabs), then use bulk generate — prefix C- plus a number range such as 1 to 60 creates C-01 to C-60 in one go, skipping any that already exist. You can also add slots one by one, renumber them, change their display order and remarks, and deactivate a slot instead of deleting it when it is temporarily out of service. Print all slot labels from the same page and stick each label on its physical slot. The page always follows the warehouse selected at the top — switch warehouse, and you are maintaining that warehouse's pool.
Once a pool exists for the warehouse, two things change. First, order slots get stricter in a good way: the system only assigns and confirms order slots that are in the pool and active. A placement pointing at a slot outside the pool is stopped, with a prompt to add that slot under Consolidation Area Setup first — no more totes quietly ending up in slots nobody tracks. (The parking spot noted on an arrival registration is checked against the parking spot registry once your warehouse has one — see the Parking Spots tab on the same page; it is still never an order slot.) Warehouses without a pool keep working exactly as before. Second, the board landing page becomes a slot wall: every slot in the pool is shown, free ones included.
The Consolidation Area Setup page holds the area’s two resources in two tabs under one area picker, and its Slot Wall tab opens with the same wall. Above the maintenance table you see every slot of the selected consolidation area as a coloured block, with the colour legend right above it — the same colours as the board wall, so grey-green is free, amber is assigned and waiting, orange is partially arrived, green is complete and ready to merge, blue is merged and waiting to be released, red means an issue, and a deactivated slot is dimmed. An occupied slot shows its order number and received/expected progress. Click any block to see that slot in detail: its current orders with customer, batch and progress, and the carts its totes came on. From the detail you can jump straight to the order’s batch page, or open Edit slot to change the slot’s number, order or remark — the same edit form as the table below. The wall follows the warehouse and consolidation area selected on the page and refreshes itself whenever you generate, add, edit or deactivate a slot, so the picture and the table never drift apart.
The second tab of the same page — Parking Spots — keeps the parking spot registry. Above its table sits the same Parking Lot view as on the Consolidation Board: every spot is a block, an occupied block shows the cart standing on it, its batch and how long it has been waiting (turning red past your warehouse alert setting); click a block to see that spot’s details and actions. A parking spot is just a painted place on the consolidation-area floor where a checked-in cart stands — it is not a warehouse location and it never holds stock. Register the spots once: use Add parking spot and the system assigns the next number itself (P-01, P-02, …) — numbers cannot be typed in, so the registry always matches the painted floor. Add a remark if a spot is special (for example “oversized carts”), deactivate a spot instead of deleting it when it is out of use, and print the QR labels from the same tab — one at a time or all at once — and stick each on its ground spot. The Occupied by column is not typed by anyone: the system works it out from carts that have checked in and not left yet, so it is always current.
Scenario — checking a cart in with a parking spot. Role: the picker or water spider who pushes the full cart to the consolidation area. Before you start: the batch is open, the cart is full, and (only if your supervisor registered the spots) a QR label is stuck on the ground spot. Steps: (1) scan the cart code to register the arrival; (2) optionally scan the QR of the ground spot the cart actually stands on — you can also skip this step and the arrival still counts, the cart simply has no parking note; (3) place the totes as usual. What the system does: if the registry exists, it checks the spot — a code that was never registered, or a deactivated spot, is refused with a plain-language message that names the code and tells you what to do next (scan a registered spot, skip the step, or ask a supervisor to register/reactivate it); if another cart already checked in on that spot and has not left yet, the check-in still goes through and the screen shows a yellow heads-up naming that cart — park there anyway only if it is really where this cart stands. Expected result: the cart shows on the board as arrived, and the block of the spot it stands on lights up in the Parking Lot with the cart on it; anyone can find the cart by its P- number, and the board counts the spot as occupied until the cart leaves.
- The number strip at the top shows slot occupancy (slots in use out of active slots), active batches, total orders, merged and ready-to-merge counts, and overall tote progress (received out of expected).
- Colors: grey is free, blue is in use with a mini progress bar, green is full and ready to merge, red means an issue (a zone component is still missing), and deactivated slots are dimmed. Each block shows the slot number in large type, the first order parked there, the customer, and its received/expected progress; click a block to open that order's batch board.
- Filters narrow the wall to one batch, or to issues only. The order cards from before are still there — switch between Slot wall and Order cards at the top of the section. Big screen mode puts the wall full-screen with a 30-second auto-refresh, made for the warehouse TV; on a phone the grid simply adapts to the narrower screen.
Watching consolidation: the Consolidation Board and the batch detail page#
Supervisors get two read-only pages for watching, separate from the Consolidation Station where the work itself happens. The Consolidation Board (WMS → Zone Picking → Consolidation Board) shows the whole warehouse at a glance; the Batch detail page opens when you click a batch number and reconstructs everything that happened to one batch. Neither page changes anything — placing totes, merging and every other action still happen on the Consolidation Station.
The Consolidation Board: three sections on one page
At the top, an attention strip counts what needs a supervisor right now: carts waiting at consolidation, carts that have waited too long, orders ready to merge, orders in progress, active batches and the overall tote progress. Below it, the zone overview lists each zone taking part in consolidation, the state of its pick tasks and how many of its totes have arrived; the carts shown on a zone block are only the ones still in that zone — the moment a cart checks in at consolidation, its plate comes off the zone block. The middle section is the Parking Lot: every registered parking spot is a block, and an occupied block shows the cart standing on it, its batch and how long it has been waiting — a cart that waits longer than your warehouse alert setting turns its block red, so a forgotten cart is visible from across the room. Carts that checked in without scanning a spot are not hidden either: each one carries a small “No spot scanned” tag on its cart card in the carts list below, and the thin alert strip at the very top of the page counts them — open it to see the list and jump straight to any cart. Click a spot block to see the cart and its orders — and for an order that is ready, a Go to merge button takes you straight into that order’s merge on the Consolidation Station. Everything is clickable: a cart or a batch opens the batch detail page, an order number opens the order.
Each zone card tells you more than tote progress: how many picked carts are still waiting to be moved out — with the longest wait turning amber first, then red past your warehouse alert setting — how many tasks are assigned, how many finished today, and who is picking in that zone right now. On warehouses running the water-spider mode, the card also shows the zone’s empty carts, in red when they drop below the minimum you set, and whether a water spider has already been dispatched. Click Open tasks on a zone card to list what is still undone there: order number, task number, state and how long it has been waiting. Carts that have started working — their totes are arriving — show their operator and start time on the cart card, and the empty-cart pool count sits next to the carts section title. Problems collect in one thin alert strip at the very top of the page: it only counts what actually blocks work — carts that never scanned a parking spot, overtime carts, slots with missing items — and it never grows taller or pushes the page down. Click the strip to open the list, jump to any item or ignore it; on the big screen the strip stays, but nothing pops up over the page.
The third section is the slot wall: every slot of the consolidation area in one grid, coloured by state. Clicking a slot no longer leaves the page: its detail opens right under the wall — the orders inside, the totes received for each and the progress — with an explicit View batch link if you do want the batch page, and a Go to merge action on slots whose order is ready. The colours mean the same thing everywhere in Docklify consolidation:
- Grey-green — free: no order is using this slot right now.
- Amber — assigned, waiting for totes: an order owns this slot but none of its totes has been placed yet.
- Orange — partially arrived: some of the order's totes are in, others are still on their way.
- Green — ready: all totes are in; the order is waiting to be merged on the Consolidation Station.
- Blue — merged, waiting for release: the order was merged; its slot frees up once packing takes the goods.
- Red — problem: something is missing for this order (a zone picked short) — open the batch detail page to see which zone is short.
- Dark grey — disabled: the slot is switched off in the slot pool and cannot be used.
The batch detail page: one batch, fully traced
Click a batch number — on the Consolidation Board, in the batch list, or on the Consolidation Station — to open its detail page. The funnel at the top counts how many orders have been picked, have reached consolidation, have been placed into slots, are complete and have been merged. Below it, each order gets its own lane: its state, its slot, its tote progress and one segment per zone, so a short zone is named instead of guessed. Expand an order to see item-level detail — every SKU with the quantity to pick and picked, per zone and task. The timeline at the bottom lists what actually happened, newest first: batch created, carts arrived, totes placed, slots assigned and released, cartons sealed, orders merged. Click any order or task number to jump straight to it.
FAQ#
- What does "Partial" mean on the board? Some of the order's totes have arrived at consolidation, others are still on their way — usually one zone is still picking, its cart has not arrived yet, or its totes have not all been placed yet. The order cannot merge yet. The board shows exactly which zones are missing, so you chase the right zone instead of the whole warehouse.
- The merge is blocked by a quantity mismatch — what do I do? Do not force it. First recount the totes sitting in the order's slot. Then open the zone task the suspect tote came from and compare picked versus expected per tote — a short pick usually explains the gap. Hand it to a supervisor: they either send a top-up pick for the missing quantity, or approve merging the order short, in which case the system marks the order as short. The block is the system protecting you from shipping the wrong quantity.
- What are the four cart statuses? Empty — idle, free to bind to a new task. In use — bound to a pick task, picking in progress. Full — the zone task is complete and the cart is waiting to be pushed to consolidation. At consolidation — arrival registered at consolidation; its totes count as received one by one as they are placed into their orders' slots, waiting for its orders to merge. After the merge of its last order, the cart returns to Empty on its own.
- When a cart arrives, what do I scan? Two different things. The cart itself: one scan of the cart code registers its arrival — no slot needed. The totes: yes, one by one — scan a tote, put it into the slot the system shows for its order, scan the slot to confirm. That per-tote confirmation is what counts a tote as received, and it is what keeps totes from landing in the wrong order's slot.
- A full cart is sitting aside and nobody knows where it belongs — what do I do? Scan the cart code with Universal Search (the middle tab on the phone). If the cart belongs to a zone-picking batch, the result shows a banner on top: the batch number and exactly where the cart goes next. When its zone is done picking it reads "Picking complete → take this cart to consolidation area CONSOL · drop point …" — just take it there. Water spiders use this all the time to clear carts that were left waiting. You do not pick a slot in advance: arriving carts just register their arrival, and an order's slot is assigned when you scan its first tote for placement in the consolidation area.
- An order is complete in one zone but another zone is slow — does consolidation wait for the whole batch? No. Orders merge one by one as each completes; the slow zone only holds its own orders, and the board keeps them visible with the missing zone highlighted until they land.
- The task list shows a regular pick task I did not create — where did it come from? When an order is split by zone, the lines that cannot go by zone (whole-pallet lines, or goods in a zone that is not set up for zone picking) are put on a regular pick task in the same batch, so nothing is left behind. In the task list it carries an orange "Zone split · regular lines" badge with the batch number and its source zones — a ⚠ on the badge means one of those zones is not registered or does not have Zone Picking on. Pick it like any normal task; its goods join the same order at consolidation.